Animated Gif: Canvas Capture and Creation. The ability to capture a frame-by-frame canvas activity to an animated gif is extremely useful, but somewhat convoluted, process (the HTMLCanvasElement is not quite there yet; maybe in ES6). Here's a sequence that will enable you to accomplish it today.
 Open your SearchAlgorithms.html page in Chrome and right-click on the canvas. Is there a Save Image As... option ?
  Try the same thing in Firefox and Safari. Any difference ?
 Using Chrome, test drive Geary's Example 1-11 (an explanation can be found on pp. 46-50 of your textbook)
 Data URI (Uniform Resource Identifier)
 HTMLCanvasElement: toDataURL() function and Example: Getting the data-url for a canvas
- Add this Example's test() function to a button's onclick() event in your SearchAlgorithms.html page and confirm it.
 Read this blog: http://antimatter15.com/wp/2010/07/javascript-to-animated-gif/.
 Prepare the downloaded resources for use with your BoM pages by placing them in a referenceable folder.
- Save your SearchAlgorithms.html to SearchAlgorithm2AnimatedGif.html and follow along with the edits.
Note 1. Be sure to have your browser's pop-up blocker disabled for this to work. Manage pop-ups or Pop-up blocker settings
Note 2. Chrome had trouble delivering on the toDataURL() function whereas Firefox executed as expected.
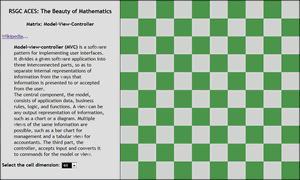
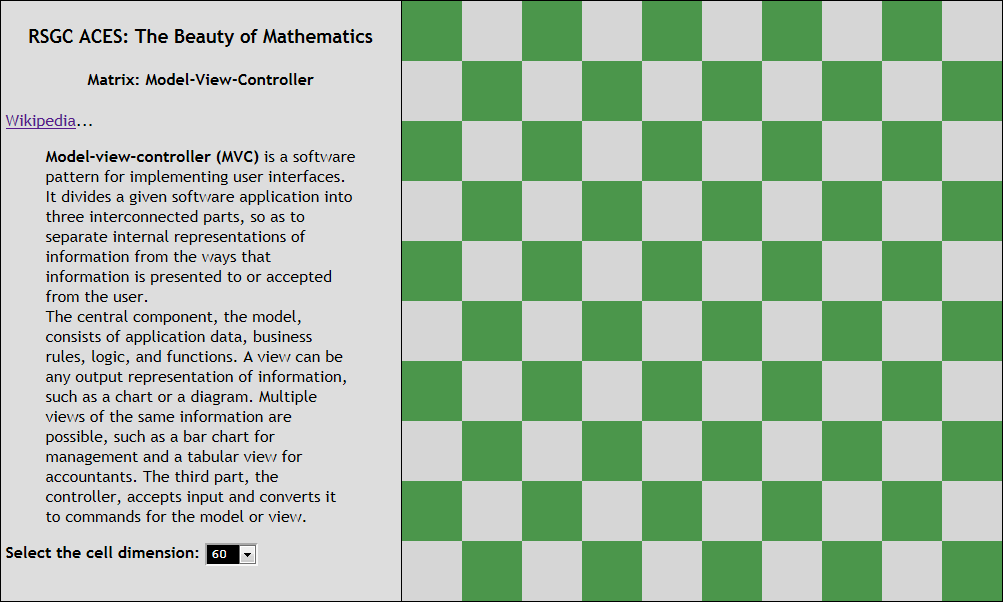
In Class Assignment. Model-View-Controller.
 Create a BoM page entitled MatrixMVC.html.
- Read Wikipedia's brief description. Cite this reference and format its opening text into the Description panel.
- Read this explanation of how to dynamically popluate a select box.
- Assemble the content for the last line in the Description Panel. From the body's onload event handler, call the function populateSelect() among other setup duties, that will add an option for each factor of the width of the canvas.
- Since our goal is to present a simple checkerboard pattern with squares of selected dimension, the onchange event handler of the select control (controller) should create a new matrix (model) of requested size (recall a matrix is simply an array of arrays: reference), somehow (your decision) ensuring the matrix can be used to immediately update the view. To this end, add two new functions (updateModel and updateView could be possible names).
To be scalable for future projects, this model should be a matrix of objects of, say, the type Cell. For simplicity, Cell objects need only have a background color property for this exercise. For the curious, Becker chose the default colours #4B964B and #D3D3D3 to model his City view.
Finally, I stumbled across a Matrix Rain animation I thought was compelling...
 Root Finding. Here's a simple strategy for finding (some of) the roots of a continuous, smooth function within a given interval of its domain.
Start at the left endpoint of the interval. Using a small increment (blue dashed arc), step through the interval, testing the sign of the range as you go. Whenever consecutive range results differ in sign (±), you can conclude the subinterval contains a root (remember, this is a continuous, smooth function). A binary search can be undertaken to locate the root, before resuming the search until the right endpoint of the interval is reached (or thereabouts).
In Class Assignment. Recursive Binary Exercises.
 Create the BoM page: RecursiveBinaryExercises.html that mimics the page to the right. Obtain the thumbnail image and it's larger linked image from our course page and place them in your images folder.
- Implement the function constrain (value, from, to) that returns a value no less than from and no greater than to. If you want a challenge, see if you can achieve the result in one expression. Note: This is a useful function than should go into your utility.js library if you have one (a similar function is offered by the Arduino language).
- Implement a <body onload=""> handler that populates the input box of Exercise 1 with a random value between 0 and 1023. In addition, for Exercsie 2, it populates a global array with 10 random 2-digit integers in ascending order. The contents of the array are to be presented, at startup, centered in an Exercise 2 <div> element as shown. One of the values of the array, the key, chosen at random, is also placed in the text box at startup.
- Exercise 1. 10-bit Recursive (Arithmetic) Binary Conversion. Develop an <input onclick=""> button handler function that uses a recursive helper function to return the 10-bit binary representation of the (constrained) user-entered value between 0 and 1023. Use the information presented in the graphic as a basis for your code decisions. The resulting value replaces the ? as the inner HTML of the adjacent <span></span> element.
- Exercise 2. Binary Search. Develop an <input onclick=""> button handler function that uses the recursive helper function, binarySearch(low,high) to determine the position of the key within the array. A result of -1 will appear if the key is not found.
- The sequence of indices encountered in searching for the key, needs to be recorded for later presentation. Create the array, sequence, prior to undertaking the binary search, and populate it with the mid locations encountered as the recursive method executes. On completion, place the contents of the sequence array within the centered <div> element.
In Class Assignment. Introduction to Recursion: Pascal's Triangle On Console.
Task.
- Create the BoM page: PascalsTriangleOnConsole.html.
- Fashion the contents of the Description Panel similar to the example, replacing the dummy Latin text with your words on the biography of this important mathematician. (image)
- With the assistance of recursive functions where possible, populate a new array with the elements for each of the requested number of rows of Pascal's
Triangle and display the array to your brower's JavaScript Console.
- Mount your page on your site by Thursday night (January 30).
|
 |
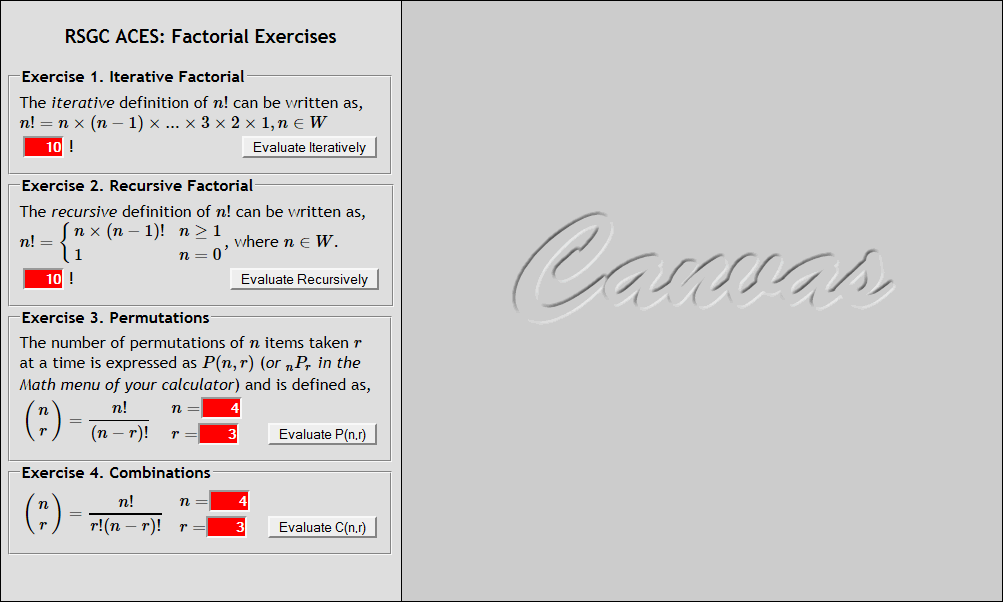
Introduction to Recursion: Factorial Exercises. Factorials play a significant role in mathematics. Completion of these exercises will give you a greater understanding of their origin and exposure to some practical applications.
- Click on the adjacect image to enlarge.
- Create a page entitled FactorialExercises.html.
- Proceed through each of the four exercises, implementing the context for each in the Description Panel and developing button event handlers that exploit recursive functions to determine each result.
- Display the result in your browser's JavaScript Console, incorporating String substitutions within the console.log() method to make the output as meaningful as possible.
|
 |
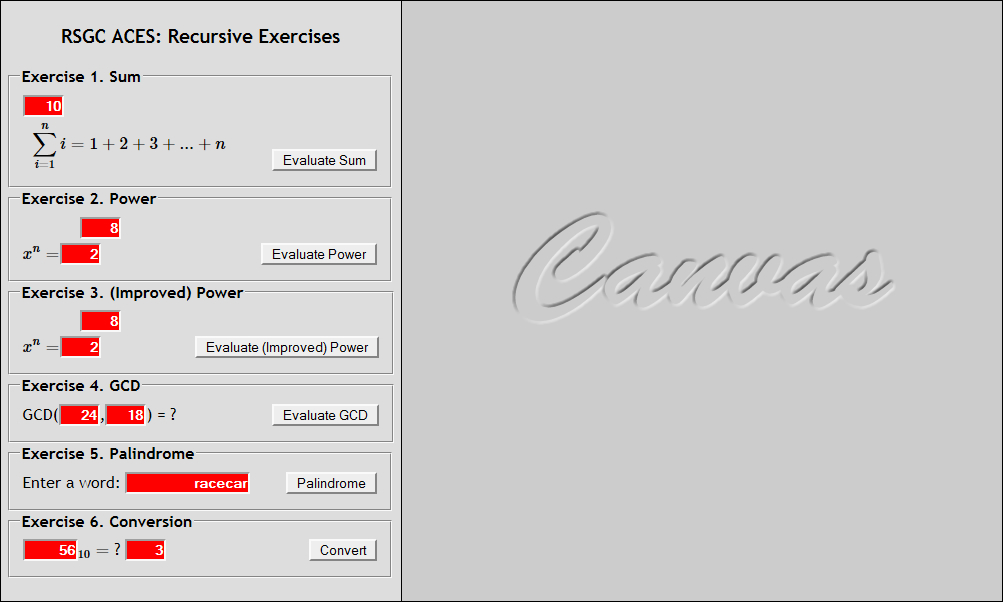
Introduction to Recursion: Recursive Exercises.
- Click the adjacent image to enlarge.
- Create a page entitled RecursiveExercises.html.
- Proceed through each of the six exercises, implementing the context for each in the Description Panel and developing button event handlers that exploit recursive functions to determine each result.
- Display the result in your browser's JavaScript Console, incorporating String substitutions within the console.log() method to make the output as meaningful as possible.
| 
|
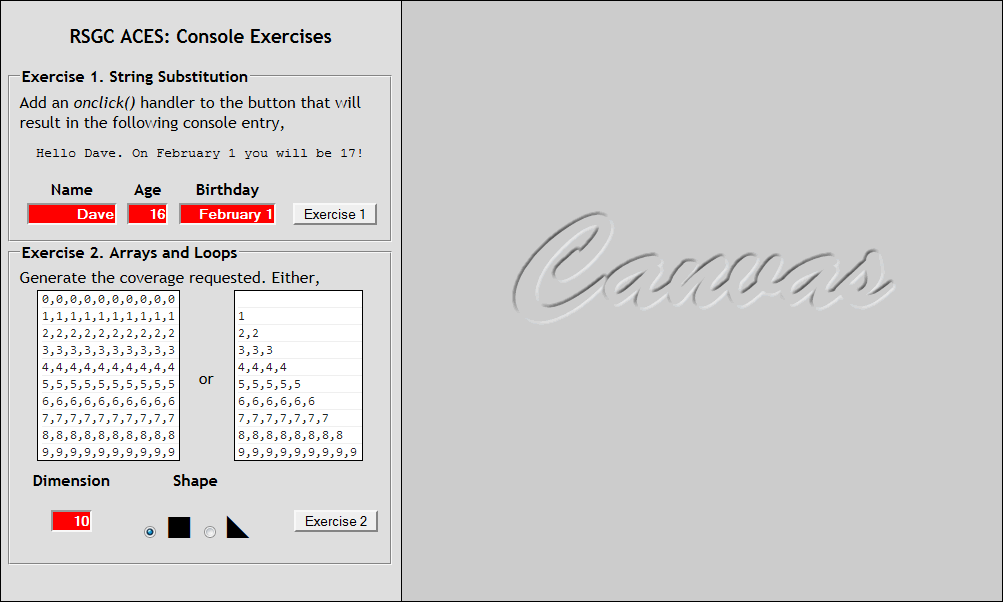
Console Exercises.
- Click on the capture to the right to enlarge
- Create a BoM page entitled ConsoleExercises.html and develop a passive implementation of the Description Panel. Embed <img> elements using src links to ConsoleSquare.gif and ConsoleTriangle.gif. Borderless tables are effective ways to align content elements.
- Complete Exercise 1. Note. Prepending a '+' to an expression overrides that use of the symbol as a concatenation operator.
- Complete Exercise 2. Note. The goal here is to use for loops to populate arrays and display their contents in the Console.
|
 |
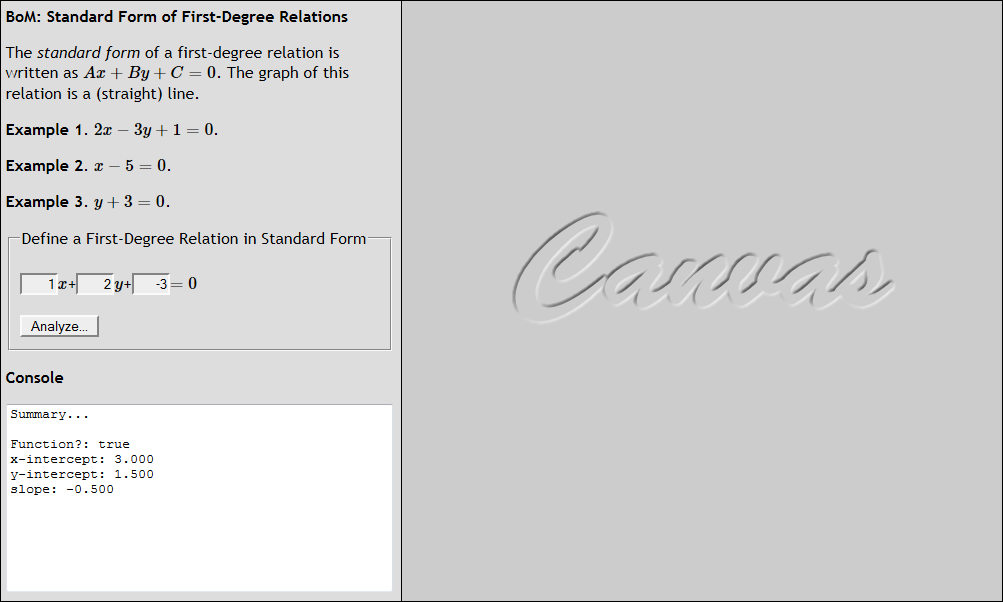
 Objects: Standard Form of First-Degree Relations.
- Click on the image to the right to enlarge and review the content of the Description and Console panels.
- Create the file StandardFormFirstDegreeRelation.html and implement the content of the Description panel.
- Using either the constructed or literal object strategy, develop an object definition to define the standard form of a linear relation that will encapsulate the necessary data and provide methods inferred by the content of the Console Panel to achieve the indicated results. Formatting options for Number objects can be found here.
- Imagine what the content of the Canvas panel could contain...
 Objects: Constructed vs Literal. Finite Arithmetic Sequence. For your first JavaScript Object exercise, you are asked to rework the script from last week's Finite Arithmetic Sequence example to demonstrate your understanding of the two different strategies for JavaScript Object creation.
Task. (Constructed Object)
- Save the file FiniteArithmeticSequence.html as FiniteArithmeticSequenceConstructedObject.html.
- Using the Constructed Object strategy, reconfigure the script to instantiate an object that corresponds to the adjacent UML diagram. The method (function) term(i) returns the i'th term in the sequence. The toString() method uses the term(i) method to assemble and return the full String version of the sequence.
- Verify!
Task. (Object Literal)
- Save the file FiniteArithmeticSequenceConstructedObject.html as FiniteArithmeticSequenceObjectLiteral.html.
- Reconfigure the script to employ the Object Literal strategy to instantiate the arithmetic sequence using the name:value pairs defined by the UML diagram. The role of each method remains unchanged.
- Verify.
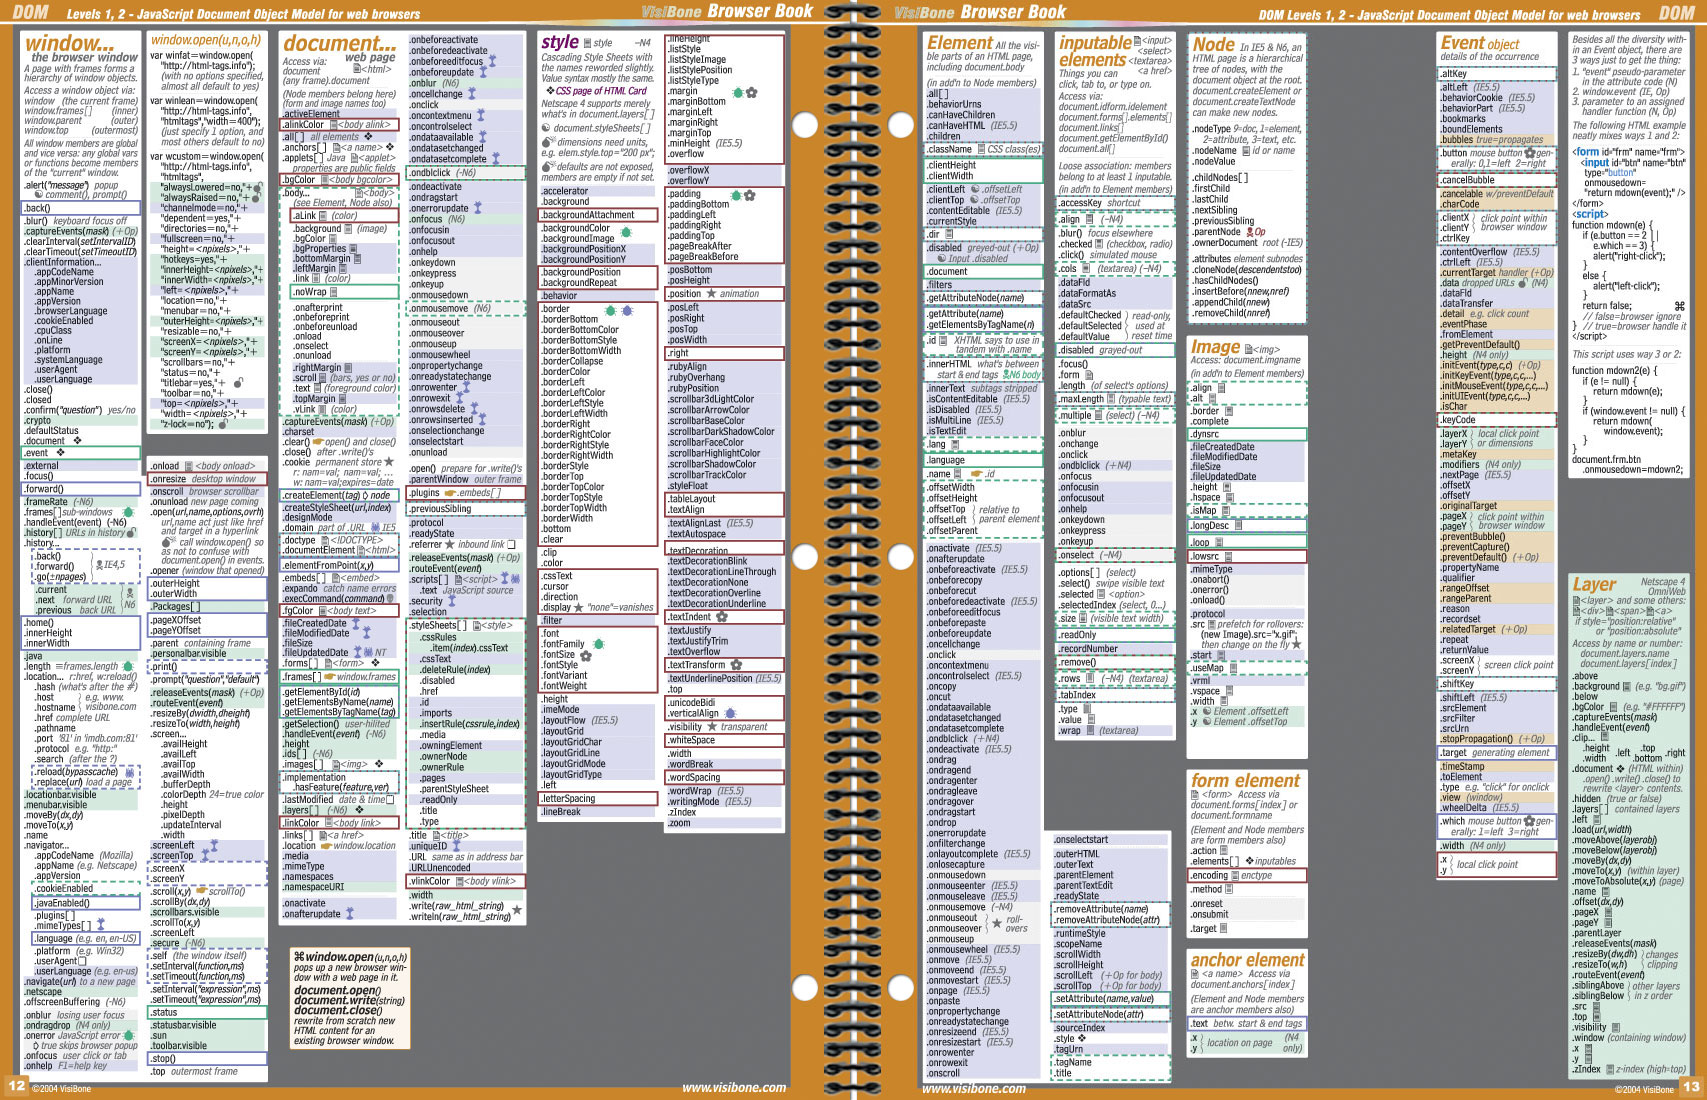
 DOM: Document Object Model. We'll explore HTML DOM Methods using this page and Chrome Developer Tools (split screen) together. Open the Console tab and undertake the following,
- display the title of the document
- display the anchors on the page
- display the first anchor
- display the name of the first anchor
- display the images
- display the number of images
- display the last image
- display the src of the first image
- display the width of the first image
- display the number of links
BOM: Browser Object Model
Create the web page OpenSSDBanner.html that includes a button with the text, Open and Center SSD Banner. When pressed, the script opens a 1020 by 120 window in the screen, centered both vertically and horizontally, with features reflecting the capture below.
 Create a BoM page entitled MatrixMVC.html.
 Create the BoM page: RecursiveBinaryExercises.html that mimics the page to the right. Obtain the thumbnail image and it's larger linked image from our course page and place them in your images folder.
 Objects: Standard Form of First-Degree Relations.
 DOM: Document Object Model. We'll explore HTML DOM Methods using this page and Chrome Developer Tools (split screen) together. Open the Console tab and undertake the following,
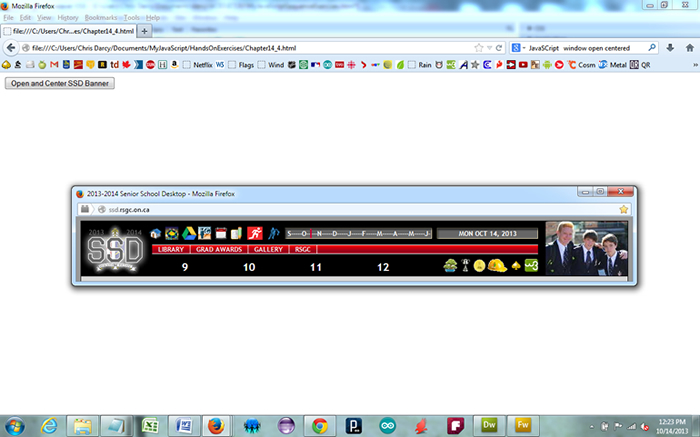