The Goal
 Life involves tradeoffs and, after taking the most important ones for our purposes into consideration, it is time to retire the Arduino IDE, in favour of ATMEL Studio 7.0 (AS7) for your embedded assembly language solutions. AS7 suite of tools offers strong support for debugging while allowing us to continue to develop on the DDP with the Sparkfun Pocket Programmer based on the USBtiny protocol.
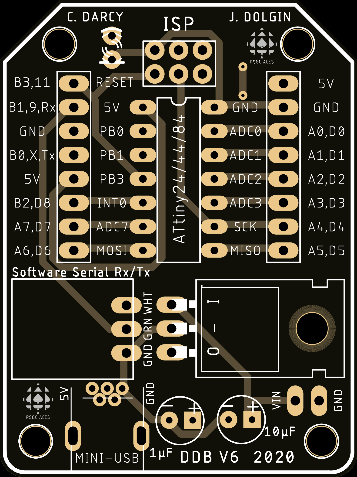
Finally, I do not need to remind you these concepts are tough sledding but, you'll soon appreciate how happy you are to have had this introduction when your future peers are swamped a few short years from now. (DDBv6 with SoftwareSerial support appears to the right)
References
The sequence of exercises below have been carefully crafted for your (possible) future as a computer engineer. Commit yourself and reap the rewards.
BareMinimum84 Template
To get us started, we'll use the code shell below. It has little more than we need, but this stuff can be tricky so better to remove what's not needed than struggle to get it to cooperate.
;PROJECT	:BareMinimum84
;PURPOSE	:Code shell for AVR Assembly projects for the DDP (ATtiny84)
;AUTHOR		:C. Darcy
;DATE		:2020 03 24
;DEVICE		:Dolgin Development Platform
;MCU		:ATtiny84
;COURSE		:ICS4U
;STATUS		:???
;REFERENCE	:https://mail.rsgc.on.ca/~cdarcy/Datasheets/doc0856.pdf
;NOTES		:
;.include	"prescalars.inc"	;assembly directive equivalent to compiler directive #include
.def		util	= r16		;readability is enhanced through 'use' aliases for GP Registers
.equ		DDR		= DDRA		;typically, we'll need the use of PortA
.equ		PORT	= PORTA		;both its data direction register and output register and, eventually,
.equ		PIN		= PINA		;its input register
; DATA Segment declarations
.dseg							;locate for Data Segment (SRAM) requirements (default start at 0x0060)
var:		.BYTE 1				;reserve one byte for a variable (the label is the symbol)
; CODE Segment (default)
.cseg							;locate for Code Segment (FLASH)
; ***** INTERRUPT VECTOR TABLE ***********************************************
.org		0x0000				;start of Interrupt Vector Table (IVT) aka. Jump Table
	rjmp	reset				;lowest interrupt address == highest priority!
.org		EXT_INT0addr		;External Interrupt Request 0 (prefined in tn84def.inc)
;	rjmp	INT0_vect
; ***** START OF CODE ********************************************************
.org		0x0100				;well clear of IVT
reset:							;PC jumps to here (start of code) on reset interrupt...
wait:
	ldi		util,0xAA
	sts		var,util
	rjmp	wait				;repeat or hold...
Activity: Project Template Creation in 3 Steps
Step 1.  First, we need to create and explore an assembly code shell that will serve a role similar to the
 BareMinimum sketch we used repeatedly in the Arduino IDE.
- Open AS7 and create a New AVR Assembly Project in your DDP
Assembly folder with the name BareMinimum84.
- Within the Device Selection dialog, select ATtiny84.
- Use the code above to replace the default
main.asm code supplied and listen carefully as we review it.
- Under the Project menu, select the BareMinimum Properties option and select the Tools button. Select Simulator as the debugger/programmer.
- Select the main.asm tab, launch the Debug menu and select, Start Debugging and Break.
- Now, simply marvel at what comes next...:)
- Within the Solution Explorer panel to the right, select the Dependencies folder and double click the
tn84def.inc file to review the complete list of .equates available to your assembly code. You are encouraged to maximize their use.
 Step 2. Next, we need to confirm we can upload code from AS7 to the DDP with your Sparkfun Pocket Programmer. Check out my very first post to our 2019/2020 ICS4U email conference, back on June 29, 2019!
- Watch this video:
 Using a USBtiny Programmer with Atmel Studio
- Here's the web tutorial of the video: http://www.crash-bang.com/using-usbtiny-with-atmelstudio/
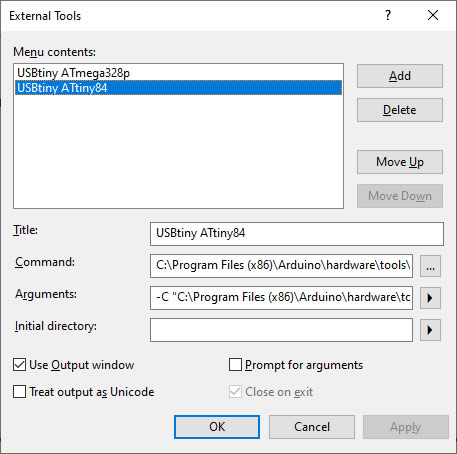
- Under the Tools Menu, select External Tools... and build a USBtiny ATtiny84 tool that will create a script to convert and upload our assembly source file to the ATtiny84 target on the DDP. Click the image to the right to enlarge.
Step 3. Finally, AS7 provides a seamless method for creating new projects from an existing code shell.
-
After saving
main.asm, select Export Template... under the File menu.
- Select Project Template and then complete the fields in the subsequent dialog box, entering
BareMinimum84 as the Template Name.
- Feel free to use the adjacent graphc for your Icon Image, and select Finish when complete.
- With luck, the next project you create can be based on your
BareMinimum84 template, providing a more productive use of your time and effort.
Activity: Bicolor Confirmation
For the exercises below, before we add the AVR Assembly complexities of serial IO, we'll find it simpler to have a bicolor LED (spanning the digital pins PA0 and PA1) to signal digital 0 or 1 or the success (or failure) of a particular assembly programming test.
Let's explore what it takes to display the two different colours on the bicolor LED. See ATtiny84 Register Summary.
- Within your DDP
Assembly folder, create a project called BicolorConfirmation, based on your BareMinimum84 template.
- Place the bicolor LED in the DDP digital pins 0 and 1.
- Within the
main function, declare digital pins 0 and 1 only, for output.
- Add functions
red, green, and LEDOff functions that achieve their expected results.
- Add code to the
reset function to confirm the correct performance of the three functions.
- Recall you can create code and access a
delay function as you did earlier in the course (AVR Delay Loop Calculator).

If..then..else Statement in AVR Assembly
- Review the details in the April 7th post to our subject conference
- Familiarize yourself with the AVR instruction: cpi (compare with immediate) See pg. 81 in this Instruction Manual
- Watch this video If..then..else Statement in AVR Assembly (10:28) prior to me coming online for our Meet. You'll find this a familiar review.
- Use these concepts and skills in this week's Bicolor Byte project.
Iteration: While
- Watch this video The While Statement in AVR Assembly
Iteration: For
- Watch this video The For Statement in AVR Assembly
Variables (FLASH and SRAM)
- Watch this video Data, Labels, Stack, and Registers in AVR Assembly