 Challenge 5. TBA
 Challenge 4. Analog-to-Digital Conversion. (Word document)
 Challenge 3. Traffic Light Sequence with Reset.
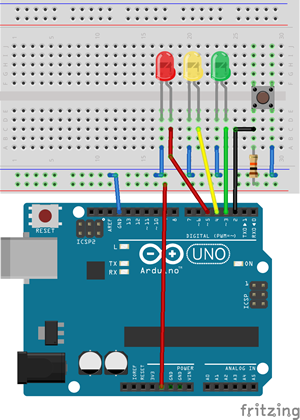 For this Challenge you will develop the pure assembly code file, Challenge3.S that will employ Timer1 in Normal Mode to drive the LED sequence green-yellow-red, continuously. A press of the momentary push button, wired for External Interrupt 0, will reset the sequence at any time, starting with green.
Task.
- Watch
 this video to see the goal of this Challenge.
- Your code is to be developed for the precise LED layout depicted to the right. This is the circuit I'll sample your code against.
- The durations for the three colours are 5s-3s-5s, exactly.
- For your ER Summary, your code is to be fully commented and placed in a Text box in your ER. Do not simply provide a link to your code hosted somewhere else.
- When you wire the circuit for your ER Summary's Media Section tomorrow night, employ a 10KΩ pullup resistor on the button even though the example we did in class before Christmas did not require one.
- Be sure you have the components in your toolkit to develop this circuit and don't forget to take your kit home!
 Challenge 2. This a three-part Challenge. Part 1 (Preparation) is meant to provide you with the skill and knowledge to successfully complete the in-class challenge on November 25.
595 Shift Register Timing Summary
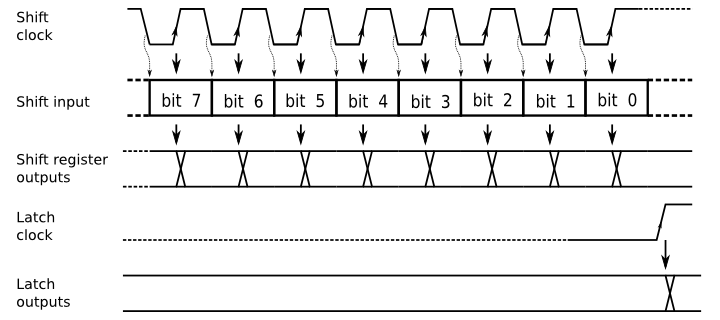
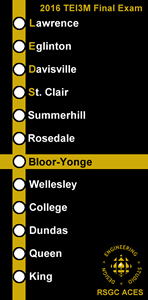 Challenge 2a. Preparation: LED Display Board II. We return to last year's TEI3M Final Exam and reprogram it in assembly language. This time around you ARE expected to include Step 7 from the Task section of the exam. You may wish to view
  Brendan's Exam Video from last year to see what you are going after.
Complete this task and submit your ER by midnight Saturday November 19 under the Subject Line: LED Display Board II.
Challenge 2b. In-Class Friday November 25.
Task.
- Watch this short video to see what your goal is. Your assembly code should display one pixel at a time on the main diagonal and repeat continuously.
- You have a small LED matrix in your kit stamped with 788BS on one face. Here is the datasheet
- Two shift registers are to be used in this project to drive the matrix (one for the anode rows and one for the cathode columns) and wired as can be seen in the breadboard view below. You are to use this layout strategy exactly when writing your code so I can test it against my prototype. To avoid the need for resistors, you could use the 3.3V supply from the Arduino.
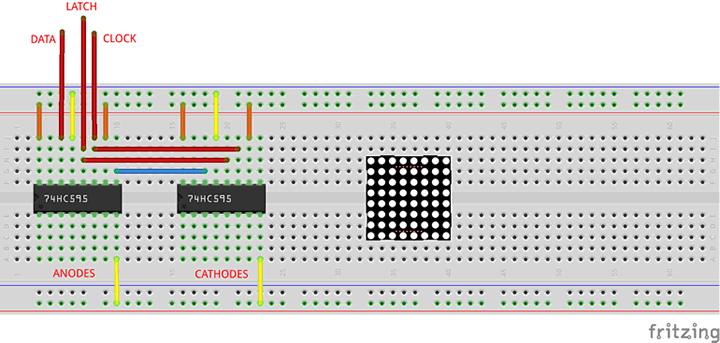
- Submit your code to handin by the end of the class under the Subject Line: Challenge 2. Code.
Challenge 2c. ER Summary. Submit your ER Summary of Challenge 2b by midnight Saturday November 26 to handin under the Subject Line: Challenge 2. ER
 Challenge 1. Decimal to Binary Conversion: Subtraction of Powers Algorithm.
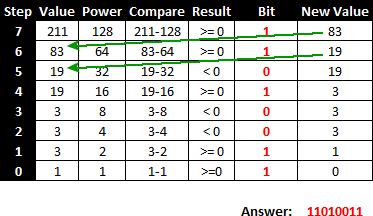 An 8-bit, pencil&paper conversion of a decimal number to binary would likely unfold as the table to the right suggests. Let's say we want to convert 211 to binary. Since it's greater than or equal to 128, the most significant bit (bit 7) would be a 1. We would then subtact 128 from 211 and our new value is 83. We reduce the power to 64 and test again. Since 83 is greater or equal to 64, Bit 6 is set to 1. The value is reduced to 19 (83-64) and the power reduced to 32. Comparing 19 and 32 results in bit 5 being 0. The value is not reduced and the power is reduced to 16. We keep going until all 8 bits have been determined.
(Note: This is more or less the hardware approach of a Successive Approximation ADC  ADC: Succ. Approx. watch some other time)
Task.
- Develop the sketch, SubtractionOfPowers.ino that implements the algorithm described above.
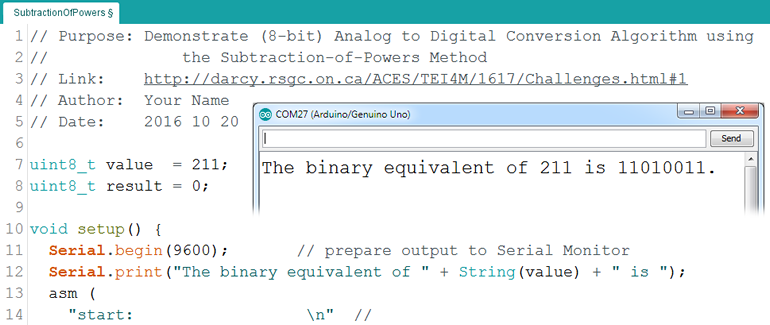
- The code should start out similar to that which appears below. The binary equivalent of the global value variable populates the global variable result. The desired output appears as in the inset and with a delay between bits on your bargraph:

- At the end of the period attach your code to an email to handin under the Subject Line: Challenge 1. Code.
- By midnight Saturday October 22, submit your ER to handin under the Subject Line: Challenge 1. ER. Be sure to include a Code section with your documented sketch formatted as described in a recent post to our F/C Conference.
![]() Challenge 4. Analog-to-Digital Conversion. (Word document)
Challenge 4. Analog-to-Digital Conversion. (Word document)![]() Challenge 3. Traffic Light Sequence with Reset.
Challenge 3. Traffic Light Sequence with Reset. For this Challenge you will develop the pure assembly code file, Challenge3.S that will employ Timer1 in Normal Mode to drive the LED sequence green-yellow-red, continuously. A press of the momentary push button, wired for External Interrupt 0, will reset the sequence at any time, starting with green.
![]() Challenge 2. This a three-part Challenge. Part 1 (Preparation) is meant to provide you with the skill and knowledge to successfully complete the in-class challenge on November 25.
Challenge 2. This a three-part Challenge. Part 1 (Preparation) is meant to provide you with the skill and knowledge to successfully complete the in-class challenge on November 25.

 Challenge 2a. Preparation: LED Display Board II. We return to last year's TEI3M Final Exam and reprogram it in assembly language. This time around you ARE expected to include Step 7 from the Task section of the exam. You may wish to view
![]() Challenge 1. Decimal to Binary Conversion: Subtraction of Powers Algorithm.
Challenge 1. Decimal to Binary Conversion: Subtraction of Powers Algorithm.
 An 8-bit, pencil&paper conversion of a decimal number to binary would likely unfold as the table to the right suggests. Let's say we want to convert 211 to binary. Since it's greater than or equal to 128, the most significant bit (bit 7) would be a 1. We would then subtact 128 from 211 and our new value is 83. We reduce the power to 64 and test again. Since 83 is greater or equal to 64, Bit 6 is set to 1. The value is reduced to 19 (83-64) and the power reduced to 32. Comparing 19 and 32 results in bit 5 being 0. The value is not reduced and the power is reduced to 16. We keep going until all 8 bits have been determined.
![]() ADC: Succ. Approx. watch some other time)
ADC: Succ. Approx. watch some other time)

