2010-2011 ROBOT SOFTWARE ENGINEERING PROJECTS |
PROJECT 'CHALLENGE' RATING (offered
to assist you with project management strategies) |
||
Routine |
Typically some deep thinking required,
but not necessarily a lot of coding. |
|
Hard |
Likely involves either a multiplicity of new concepts, designs and/or algorithms. |
|
Really Hard |
Start immediately, think
hard, employ a stepwise refinement strategy and post concerns
as required. |
|
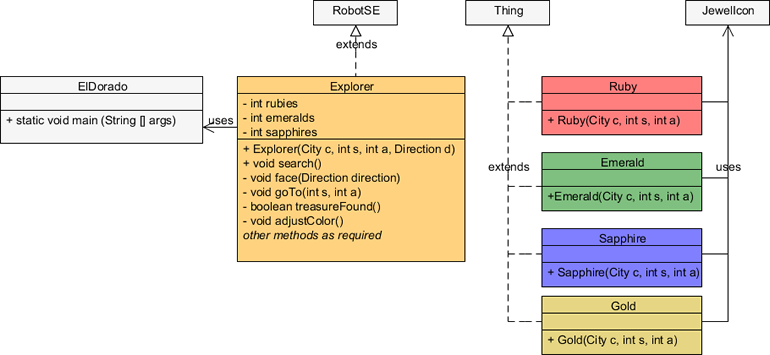
![]() El Dorado. As is typical of most Explorers your quest for the Lost City of Gold is guided by a treasure map that details the locations of caches of precious stones (rubies, emeralds, and sapphires). Your original colour is black. At each location, you first identify whether the item is an instance of a Gold object. If it is, set your label to Eureka! and retire comfortably, otherwise continue. The map instructs you to pick up all the jewels at the location, recording the number of each variety (r, g, b). As you pick up the jewels, one-by-one, your colour changes to reflect the r, g, b totals. After acquiring all the jewels from a cache, the total number of jewels of each variety, together with a simple arithmetic calculation, will enable you to identify the location of the next cache. The formula for the street and address of the next cache is as follows,
El Dorado. As is typical of most Explorers your quest for the Lost City of Gold is guided by a treasure map that details the locations of caches of precious stones (rubies, emeralds, and sapphires). Your original colour is black. At each location, you first identify whether the item is an instance of a Gold object. If it is, set your label to Eureka! and retire comfortably, otherwise continue. The map instructs you to pick up all the jewels at the location, recording the number of each variety (r, g, b). As you pick up the jewels, one-by-one, your colour changes to reflect the r, g, b totals. After acquiring all the jewels from a cache, the total number of jewels of each variety, together with a simple arithmetic calculation, will enable you to identify the location of the next cache. The formula for the street and address of the next cache is as follows,
(street, avenue) = ((r×g×b) mod 7, (r+g+b) mod 7)
Task.
 Create a project called ElDorado and add this driver to the src folder.
- Add TreasureMap.txt, Ruby.gif, Emerald.gif, Sapphire.gif and Gold.gif to the root folder. You are not to modify any of the supplied files.
- Develop the Explorer, Ruby, Emerald, Sapphire, Gold and JewelIcon classes according to loose UML diagram below. Be sure to use stepwise refinement practices, keeping your methods as concise and efficient as possible.
- Attach the six files indicated is Step 3 to an email to handin entitled El Dorado, by the deadline.
- Note. For the final evaluation of your project a different Treasure Map will be used.
In this project you are granted slightly more freedom to demonstrate how much you've learned, particularly in the area of class design. So, get started early, work on it in stages, think deeply, and make justifiable design decisions.

![]() Election. Since there is a federal election two days after you submit this assignment, it only made sense to base it around the event. Consider an ideal Ontario riding with 36 voters in which there is exactly one eligible voter in each household. For our purposes, the task of each of the four politicians is to canvass each residence in the riding, collecting their own votes (it matches their party's colour) from each of the decided (non-black) voters. Since the Bloc Quebeçois do not run candidates outside of Quebec, the light blue votes will be left behind as well. To make it easy on the candidates to know when to prepare for the next street, walls have been positioned at the ends of each street. At the end of the simulation, the politicians finish by retreating to their party's headquarters, facing south, and then dumping all the votes they've collected. Run the applet a few times to study a number of random configurations before completing the task defined below.
Election. Since there is a federal election two days after you submit this assignment, it only made sense to base it around the event. Consider an ideal Ontario riding with 36 voters in which there is exactly one eligible voter in each household. For our purposes, the task of each of the four politicians is to canvass each residence in the riding, collecting their own votes (it matches their party's colour) from each of the decided (non-black) voters. Since the Bloc Quebeçois do not run candidates outside of Quebec, the light blue votes will be left behind as well. To make it easy on the candidates to know when to prepare for the next street, walls have been positioned at the ends of each street. At the end of the simulation, the politicians finish by retreating to their party's headquarters, facing south, and then dumping all the votes they've collected. Run the applet a few times to study a number of random configurations before completing the task defined below.
Task.
- Create a project called Election and drop in the Election.java driver and Riding.java classes. You are not to modify either of these classes in any way and you are not required to attach them to your submission.
- A review of the driver will point you in the direction of what additional classes are required. Maximum credit will be reserved for those submissions that reflect strong class design principles and stepwise refinement strategies.
- Submit ALL fully javadoced classes with the exception of driver (Election.java) and Riding.java by the deadline.
Farming With Six Threads. This example is presented to you in support of your Castles assignment. Run the applet and observe both the similarities and differences between Harvester and Planter objects. You'll find all the source code in our ICS2O email conference. Create the project yourself and determine how closely this fits with the expectations for your Short- and LongWallGuards.
![]() Castles. Based
on Programming Projects 3.12 and 3.13. In this assignment
you are to demonstrate your understanding of the critical concepts introduced in Chapter 3,
Castles. Based
on Programming Projects 3.12 and 3.13. In this assignment
you are to demonstrate your understanding of the critical concepts introduced in Chapter 3,
- the problem-solving strategy known as Stepwise Refinement (aka top-down design)
- the Helper Method Pattern
- the Multiple Threads Pattern
- the Template Method Pattern
Task.
- Create the Project, Castles, drop in this driver, and add statements appropriate for the comments.
- Similar to Figure 3-13 on page 150 and using a Stepwise Refinement strategy, develop the three classes named GuardBotTemplate, LongWallGuard and ShortWallGuard to patrol the walls of the respective castles, continuously. To assist with the development process, you will use the UML drawing utility in this development, naming it GuardHierarchy.uxf.
- For the canvas, you will need to develop Shire.java and Castles.txt to support the call.
- Although the applet uses the default Robot Icon, your guards will use the graphics, Knight1.gif and Knight2.gif as shown in the static image above. For this feature you will develop the WallGuardIcon class that parallels the SpidermanIcon class from the previous SuperHero project. You are to strategically apply the icons to ensure the horses' hooves are always facing their respective castles (except while turning of course).
- To achieve simultaneous and continuous patroling, you will need to insert
your primary method call into the following loop statement within your run() method,
	while (true) {
		// insert method call(s) here

	}
![]()
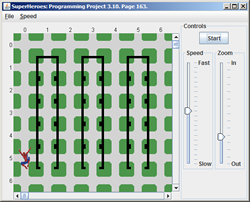 SuperHeroes. Based
on Programming Project 3.10.
Read
the problem specification on page 163 as many times as it takes to fully
understand
the task before beginning.
Ignore part a) where it requests that the buildings are read in from a file.
Instead, create the buildings as requested in part b). The highest credit
will be reserved for those projects that reflect a stepwise
refinement approach leading to well-named, single-purpose
methods.
I've incorporated an icon technique that uses an image file
to provide for a more interesting simulation.
Finally, since an execution of the project will
not be provided you are to rely exclusively on the written specifications
of the task.
SuperHeroes. Based
on Programming Project 3.10.
Read
the problem specification on page 163 as many times as it takes to fully
understand
the task before beginning.
Ignore part a) where it requests that the buildings are read in from a file.
Instead, create the buildings as requested in part b). The highest credit
will be reserved for those projects that reflect a stepwise
refinement approach leading to well-named, single-purpose
methods.
I've incorporated an icon technique that uses an image file
to provide for a more interesting simulation.
Finally, since an execution of the project will
not be provided you are to rely exclusively on the written specifications
of the task.
Task.
- Create a project called SuperHeroes and drop in the driver file SuperHeroes.java.
- Add the graphic file SpiderBot.gif to the root folder of the project.
- Add the class file SpiderBotIcon.java to the src folder of the project.
- You are not to modify the three previous files in any way.
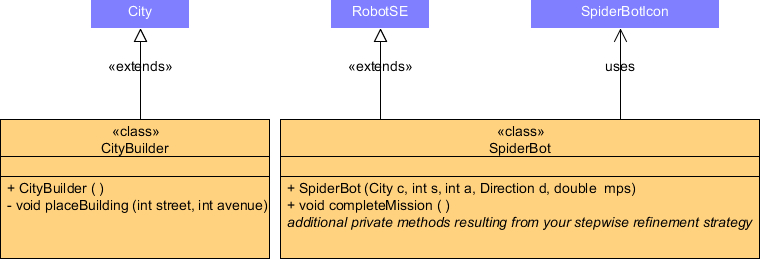
- Examination of the driver class reveals the need for CityBuilder and SpiderBot classes. Their UML diagrams appear below. Note. The fifth parameter of the SpiderBot constructor is to be interpreted as the default speed (movesPerSecond) of the object.
- Due to gravity, the speed of the SpiderBot's descent of a building is twice the normal speed of the object. One intersection prior to landing the descent, the speed of the SpiderBot is restored to its normal speed before continuing (this ensures a soft landing)
- The project finishes with the SpiderBot object at intersection (5,6).
Attach fully javadoced CityBuilder and SpiderBot class files (only) to an email to handin with the Subject Line SuperHeroes by the deadline.
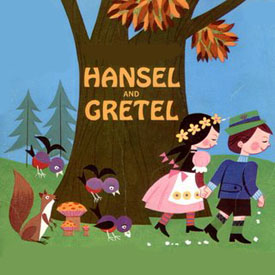
![]() Hansel
and Gretel.
This assignment is based loosely on Project 2.9
found on page 109 and partly on the
nasty
Hansel and Gretel fable (feel
free
to refresh
your memory).
To begin, study
the
applet
version
of the two children dropping pebbles as they move deeper into the forest.
Hansel
and Gretel.
This assignment is based loosely on Project 2.9
found on page 109 and partly on the
nasty
Hansel and Gretel fable (feel
free
to refresh
your memory).
To begin, study
the
applet
version
of the two children dropping pebbles as they move deeper into the forest.
 |
Task.
- Read the description for Project 2.9 on page 109 over thoroughly. Twice.
- Create a project called HanselAndGretel and drop in this driver. You will reuse your specific maze file from the previous EscapeMaze project to create the City.
- A study of the statements in the driver reveals the need for a Child class and a House class. Drop in House.java and look it over. You do not need to change this file but some of you might be interested in learning how a CompositeIcon can be created.
- In the Escape Maze project you were asked to put a Thing on every intersection the Robot encountered, prior to moving. In this project you are required to bind putting and moving together, so, as Project 2.9 suggests, every time a Child object's move method is called, it drops a Pebble, prior to moving.
- A Pebble is a subclass of Thing and displays as a small white CircleIcon, 25 of which are automatically made by a Child object at the moment of construction. Look carefully into the javadoc of Robot to find a method that will help you with this.
- Examine the driver's walkIntoForest() method to determine the additional public methods the Child class must offer.
- Using the UML Drawing Applet, develop a class heirarchy diagram that reflects the inheritance relationship between the RobotSE and Child classes as well as the Pebble and Thing classes. Save the file as HanselAndGretel.uxf.
- Complete the implementation of the methods of the HanselAndGretel, Child, and Pebble classes to reflect the result of the applet above.
![]() Relay
Race. Note. Soon after
you started your study of electric circuits back in September, I cautioned
you
not to
depend
too
heavily on the photos of the final circuit. Rather, you were encouraged to examine each schematic
thoroughly to gain an appreciation of the behaviour of the circuit. Five
months later finds you in a parallel situation. You are cautioned again,
not to depend too heavily on the executable version of the application I
will
continue
to provide
in the
short run, but rather, focus intently on the specification of each task and
think deeply about the concepts you have been introduced to.
Relay
Race. Note. Soon after
you started your study of electric circuits back in September, I cautioned
you
not to
depend
too
heavily on the photos of the final circuit. Rather, you were encouraged to examine each schematic
thoroughly to gain an appreciation of the behaviour of the circuit. Five
months later finds you in a parallel situation. You are cautioned again,
not to depend too heavily on the executable version of the application I
will
continue
to provide
in the
short run, but rather, focus intently on the specification of each task and
think deeply about the concepts you have been introduced to.
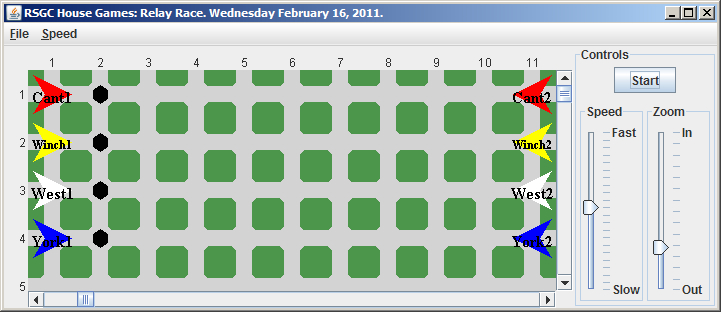
Specification. As part of Spirit Week activities this week, RSGC's House Games include a Relay Race in the gym on Wednesday. Two members of each house are selected at random to compete in an event that requires Partner 1 to dribble a soccer ball the length of the gym to partner 2. Partner 2 dribbles the ball back to it's original position, turns around at the starting line and dribbles it back to Partner 1. Partner 1 returns the ball to its original position and then sets up at the starting line in the initial position. Athletes are in their house colours, labelled, and assigned a random speed for each running of the event. Finally, each house performs the task separately with, presumably, Mr. Thornbury recording the time for each house. Check it out: . Here is the initial (and final) situation...
 -->
-->
Task.
- Create a Java project entitled RelayRace and add a driver class by the same name.
- Add the source code for the class BallIcon to the project. You are not expected to understand the technique employed to create custom icons, but some of you might find it interesting.
- Study the UML diagrams below for the Athlete and SoccerBall classes
and develop full implementations for them in your project.

- Develop the RelayRace driver class making the most efficient use of the public interface of the Athlete and SoccerBall classes.
Finally, attach all your fully-documented source files (RelayRace, Athlete, and SoccerBall) to an email to handin with the Subject Line: Relay Race by the deadline.
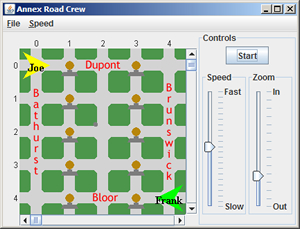
![]() Road
Crew. Dusk is falling and with so much
construction in the Annex, road crew workers have been dispatched to manually
turn on all the construction
Flashers.
The Streetlight located
near the RSGC campus at the northwest corner of Howland and Barton has a
switch that can be thrown after
the road crew is finished. Click the button to launch
a sample
run of
the evening's work.
Road
Crew. Dusk is falling and with so much
construction in the Annex, road crew workers have been dispatched to manually
turn on all the construction
Flashers.
The Streetlight located
near the RSGC campus at the northwest corner of Howland and Barton has a
switch that can be thrown after
the road crew is finished. Click the button to launch
a sample
run of
the evening's work.
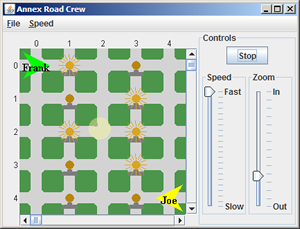
| Initial Situation | Final Situation |
 |
 |
Task.
- Run the application a number of times to glean as much information as possible before you begin to code. There are some subtle details and behaviours embedded in this project I hope to see in your final submission.
- When you are satisfied you understand what is required, create a Java project entitled RoadCrew and set up the initial situation as depicted above exploiting numerous instances of the Object Instantiation Pattern. You do not need to name the roads; they have been added simply for the purposes of explaining the task.
- Ongoing consultation of the class documentation should enable you to duplicate the run as closely as possible using numerous instances of the Method (Command) Invocation Pattern.
- Fully document and format your source code.
Attach your RoadCrew source code to an email to handin with the requested Subject Line by the deadline.
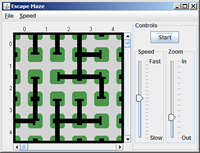
![]() Escape
Maze. In this project you will gain familiarity with a number of methods
of the Robot class. Each of
you has a unique 5×5 maze you are to navigate your way out of. The exit
of the maze is located at the east wall of intersection (4,4).
Escape
Maze. In this project you will gain familiarity with a number of methods
of the Robot class. Each of
you has a unique 5×5 maze you are to navigate your way out of. The exit
of the maze is located at the east wall of intersection (4,4).
Task.
 Create a project called EscapeMaze and
add a driver class by the same name.
Create a project called EscapeMaze and
add a driver class by the same name.- Construct a City object from the file below that bears your name.
- Model yourself as a Robot object initially located at (0,0), facing west, and with at least 25 Things in your backpack. Set the label to your first name.
- Using various Robot methods, navigate yourself as efficiently as possible to the exit, dropping a Thing object on every intersection you traverse. Finish facing east.
- Format and fully document your EscapeMaze source code.
- Attach only your EscapeMaze source code file to an email to handin with the Subject Line: Escape Maze by the deadline.
![]() Floor Plan.
The chance of a your family surviving a fire is greatly increased if the
TFD has access to the floor plan of your house. For your first assignment you
are asked to develop a floor plan of the main floor of their
own home.
Floor Plan.
The chance of a your family surviving a fire is greatly increased if the
TFD has access to the floor plan of your house. For your first assignment you
are asked to develop a floor plan of the main floor of their
own home.
Task.
- Create a Java Project called, FloorPlan, and add a class by the same same (from here on in I will refer to the class containing the main method as the driver class)
- Instantitate a City object in your main method that approximates the dimensions of the main floor of your house. Stick to a consistent scale.
- Add Wall objects to your City object that model the layout of the main floor of your house. Do not place Wall objects wherever doors (interior and exterior) exist.
- Position Thing objects wherever tables (kitchen, dining room, etc.) exist. Leave them yellow (Color.yellow).
- Position red Thing objects on intersections adjacent to the exterior doors.
- Position a Robot (you) anywhere within your house. Add your name as a label on the Robot object.

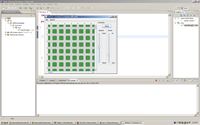
![]() Eclipse
Screen Capture. After
successfully installing Eclipse,
creating your First Robots project, and running it, you are to take a screen
capture similar to the
one on the right and attach it to an email to handin. In this way we
can both be confident you have a working Robots Integrated
Development Environment (IDE).
Eclipse
Screen Capture. After
successfully installing Eclipse,
creating your First Robots project, and running it, you are to take a screen
capture similar to the
one on the right and attach it to an email to handin. In this way we
can both be confident you have a working Robots Integrated
Development Environment (IDE).