2012-2013 SOFTWARE ENGINEERING PROJECTS |
PROJECT 'CHALLENGE' RATING (offered
to assist you with project management strategies) |
||
Routine |
Typically some deep thinking required, but not necessarily a lot of coding. |
|
Hard |
Likely involves either a multiplicity of new concepts, designs and/or algorithms. |
|
Really Hard |
Start immediately, think
hard, employ a stepwise refinement strategy and post concerns
as required. |
|
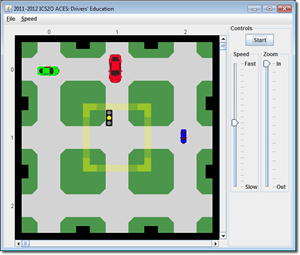
![]() Drivers' Ed. The Final Project. With many of you about to get behind the wheel in the months ahead, the ACES Driving School (it actually exists!) is pleased to announce our own Drivers' Education course. We're going to take this project to another level. Rather than me laying down the specification of the task, we're going to develop the requirements together through collaboration and observation. To facilitate the discussion,
Drivers' Ed. The Final Project. With many of you about to get behind the wheel in the months ahead, the ACES Driving School (it actually exists!) is pleased to announce our own Drivers' Education course. We're going to take this project to another level. Rather than me laying down the specification of the task, we're going to develop the requirements together through collaboration and observation. To facilitate the discussion,
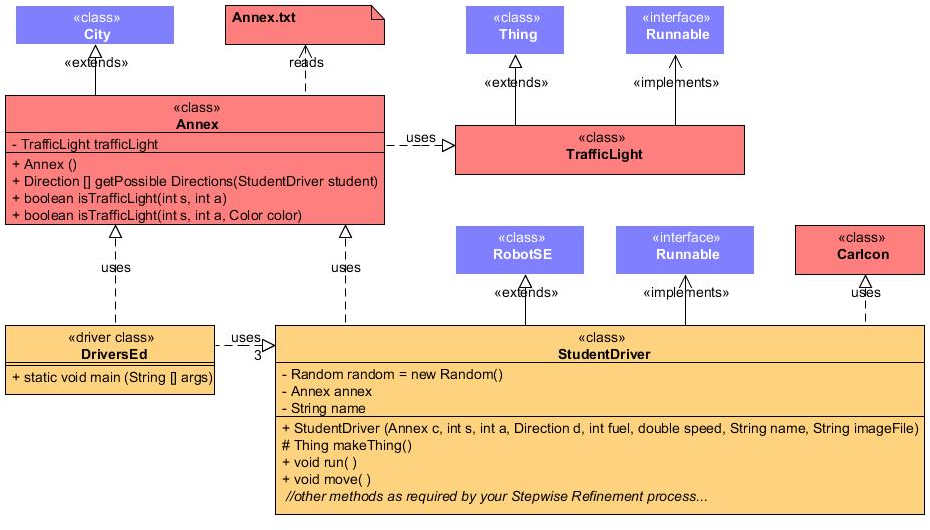
- Review the UML diagram below to determine the required classes for this project, their interrelationships, and who their respective authors are (Prof. Becker, Mr. D., or you).
- Download DriversEd.zip, extract its contents and confirm what files are provided.
- Launch DriversEd.jar carefully noting the behaviour of the application before the Start button is pressed. Draw some conclusions about what resources appear to be available and their respective behaviours.
- (StudentDriver) The StudentDriver constructor accepts 8 parameters. The specific details of each of the them can be found in the documentation for the DriversEd class.
- You can see from the UML diagrams that the Annex class offers the public method: getPossibleDirections(). When a StudentDriver object calls this method, passing itself as the only parameter, an array of possible directions is returned from which one can be randomly selected. This can be done in much the same manner as we did in an earlier exercise in the Decisions project we worked on a few weeks ago. You may recall this statement,
Avatar zelda = new Avatar(hyrule,random.nextInt(7),random.nextInt(7),

Direction.values()[random.nextInt(4)*2], random.nextInt(100));Direction.values()returns the array of all possible directions from which we selected an (even) one. Once the direction is identified, you'll find the face(Direction) method we developed a couple of weeks ago handy.

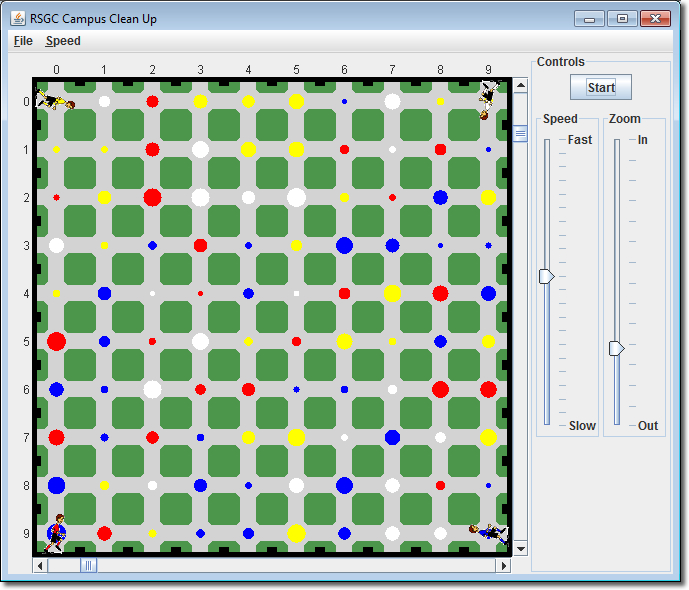
![]() Campus Clean Up (Focus: the while statement). To keep our redeveloped campus in tip-top shape, a student from each House has been selected for the task of helping to clean up the perimeter. Fortunately, each Georgian is only required to pick up litter that corresponds to his own House colour. Georgians are only required to tidy up the perimeter of the campus, not the interior area. Futhermore, Georgians can't carry any more than 9 pieces of litter. Once they reach their limit, Georgians simply appear to stop. Download and unzip CampusCleanUp.zip and take the project for a spin. As you will notice, every time the application is run, the campus dimensions vary, but always remain bounded by perimeter walls that your code will exploit.
Campus Clean Up (Focus: the while statement). To keep our redeveloped campus in tip-top shape, a student from each House has been selected for the task of helping to clean up the perimeter. Fortunately, each Georgian is only required to pick up litter that corresponds to his own House colour. Georgians are only required to tidy up the perimeter of the campus, not the interior area. Futhermore, Georgians can't carry any more than 9 pieces of litter. Once they reach their limit, Georgians simply appear to stop. Download and unzip CampusCleanUp.zip and take the project for a spin. As you will notice, every time the application is run, the campus dimensions vary, but always remain bounded by perimeter walls that your code will exploit.
Task.
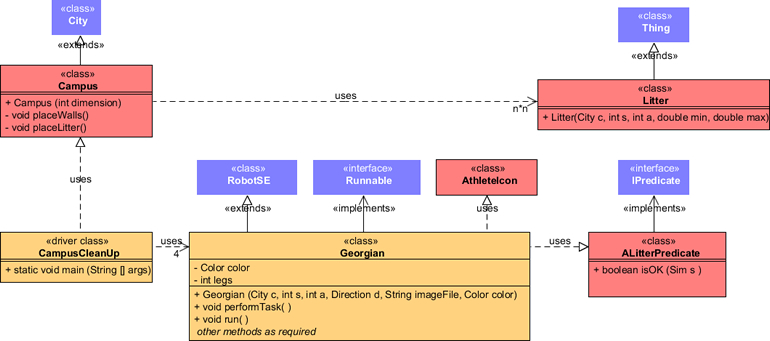
- Review the UML below to familiarize yourself with the classes and their interrelationships. As has been the case, only the classes displayed with an orange background need to be implemented. The blue classes are contained in becker.jar and the red classes are contained in CampusCleanUp.jar.
- Create a project called CampusCleanUp, add becker.jar and CampusCleanUp.jar files to the Build Path, and add the .gif images from the download to the root folder of the project.
- Implement the driver class that instantiates an object of the Campus class as it's City, adds four Georgians to the corners exactly as the executable jar does and finishes by mounting each Georgian on their own Thread prior to launching the application.
- The Campus constructor receives a random dimension (between 5 and 15 inclusive) from the driver before it adds a single instance of the Litter class to each intersection. Litter objects appear in one of four House colours (chosen randomly) and come in different sizes (again, chosen randomly).
- Since the CampusCleanUp driver generates the dimension of the Campus, it can easily determine where to initially locate the four Georgians.
- Submit fully documented source code for the CampusCleanUp and Georgian classes by the deadline.
![]() Save The Planet (Focus: the if statement). In recognition of Earth Week here's a project to enable you to (what else?) save the planet. As you can see by the opening scene below, the planet is in bad shape. The only way to restore it to healthy status is to undertake (what else?) a binary challenge.
Save The Planet (Focus: the if statement). In recognition of Earth Week here's a project to enable you to (what else?) save the planet. As you can see by the opening scene below, the planet is in bad shape. The only way to restore it to healthy status is to undertake (what else?) a binary challenge.
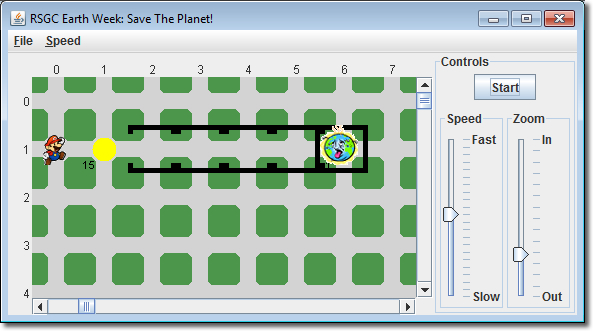
Mario represents an object of the BinaryBot class. Every time the application runs, a random number of Things (between 0 and 15 inclusive) appears at (1,2). He must pick up all the Things, enter the 4-bit nybble-chamber and deposit all the Things across the chamber in piles that are the appropriately-weighted powers of 2 (8-4-2-1). Once he has completed the task, his backpack will be empty and he can ask if the east Wall at (1,5) is passable. If he has been successful, the method returns true and the Wall will not block his passage. Once on the planet, he can request that the planet be saved.
Download and extract all the files from SaveThePlanet.zip and run it as many times as it takes to gain an understanding of the task.
NOTE: This project sets up a little differently than the previous ones and will likely become the norm.
A total of 6 classes are required of which you are required to develop only one, BinaryBot.
The source code of the driver is provided but only the bytecode (.class) files are provided for the other four.
This bytecode is made available to your project by adding the SaveThePlanet.jar file to its Build Path in precisely the same manner as you add becker.jar to each project.
Identify the /doc folder as the Javadoc location and you'll be able to access the documentation within Eclipse.
The 3 .gif image files must be added to the root folder of the project as you have become accustomed.
Task.
- Create a project by the name of SaveThePlanet and add this driver to the src folder.
- Add the 3 gif files (SuperMario.gif, SickPlanet.gif and HealthyPlanet.gif) from your earlier download to the root folder of the project.
- Review the full Javadoc for this project.
- Attach BinaryBot.java to an email to handin with the Subject Line: Save The Planet by the deadline.
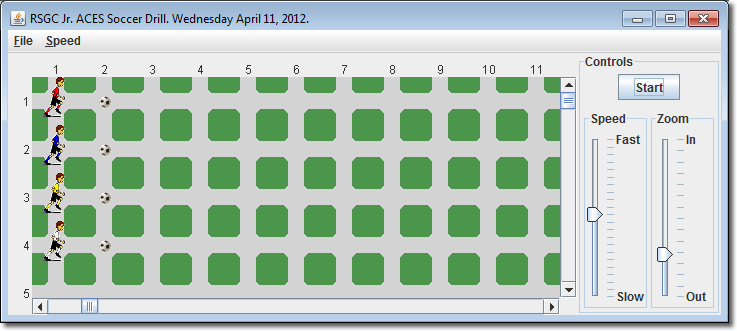
![]() Soccer Drill (Threads). An athlete from each house has been selected
to compete in
a demonstration event to promote an indoor House Soccer League being held in the gym this term. Competitors line up on Avenue 1, on each of the first 4 streets. Soccer balls are placed on Avenue 2. Competitors pick up their ball on Avenue 2 and dribble it to Avenue 10, drop it off, and turn around on Avenue 11. They duplicate the drill (exactly!) on the way back, eventually coming to rest with themselves and their ball in the same position as at the start of the drill. Athlete icons are
to be loaded as gif images in their house colour and assigned a random speed over the closed integer interval [1,5]. Here's the zip file containing SoccerDrill.jar and the 9 gif images.
Soccer Drill (Threads). An athlete from each house has been selected
to compete in
a demonstration event to promote an indoor House Soccer League being held in the gym this term. Competitors line up on Avenue 1, on each of the first 4 streets. Soccer balls are placed on Avenue 2. Competitors pick up their ball on Avenue 2 and dribble it to Avenue 10, drop it off, and turn around on Avenue 11. They duplicate the drill (exactly!) on the way back, eventually coming to rest with themselves and their ball in the same position as at the start of the drill. Athlete icons are
to be loaded as gif images in their house colour and assigned a random speed over the closed integer interval [1,5]. Here's the zip file containing SoccerDrill.jar and the 9 gif images.
Task.
- Create a Java project entitled SoccerDrill and add a driver class by the same name.
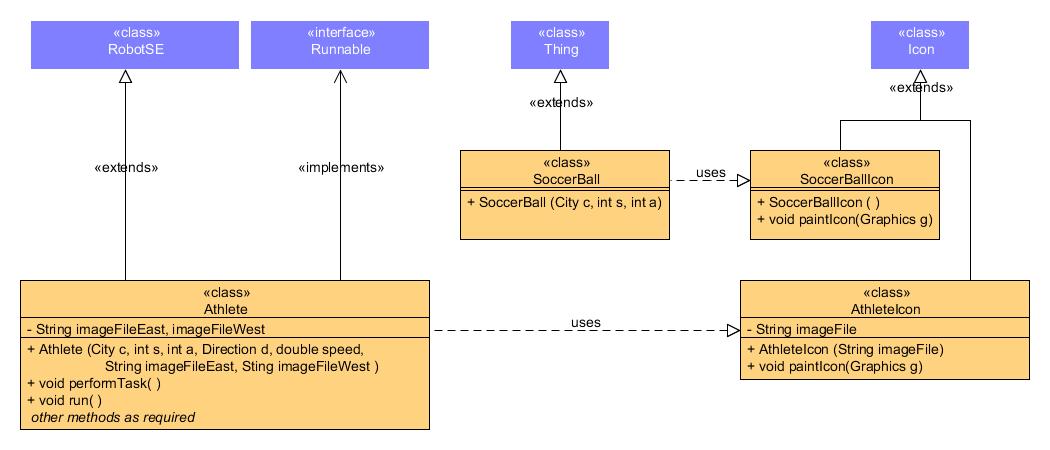
- Study the UML diagrams below for the required classes and develop full implementations for them in your project to achieve the same outcome as depicted in SoccerDrill.jar (found in the SoccerDrill.zip download).
- Note. To have the images appear centered with an intersection (not off-center or ill-proportioned) use the following numeric parameters in the paintIcon(Graphics g) method of the respective Icon files:
In SoccerBallIcon: g.drawImage(bi, 40, 40, 64, 64, 0, 0, 24, 24, null; In AthleteIcon: g.drawImage(bi, 10, 30, 93, 79, 0, 0, 83, 49, null); - Don't forget to fully document all your classes prior to submission.
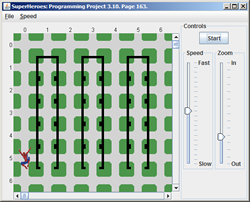
![]() SuperHeroes. Based
on Programming Project 3.10.
Read
the problem specification on page 163 as many times as it takes to fully
understand
the task before beginning.
Ignore part a) where it requests that the buildings are read in from a file.
Instead, create the buildings as requested in part b). The highest credit
will be reserved for those projects that reflect a stepwise
refinement approach leading to well-named, single-purpose
methods.
I've incorporated an icon technique that uses an image file
to provide for a more interesting simulation.
Finally, since an execution of the project will
not be provided you are to rely exclusively on the written specifications
of the task.
SuperHeroes. Based
on Programming Project 3.10.
Read
the problem specification on page 163 as many times as it takes to fully
understand
the task before beginning.
Ignore part a) where it requests that the buildings are read in from a file.
Instead, create the buildings as requested in part b). The highest credit
will be reserved for those projects that reflect a stepwise
refinement approach leading to well-named, single-purpose
methods.
I've incorporated an icon technique that uses an image file
to provide for a more interesting simulation.
Finally, since an execution of the project will
not be provided you are to rely exclusively on the written specifications
of the task.
Task.
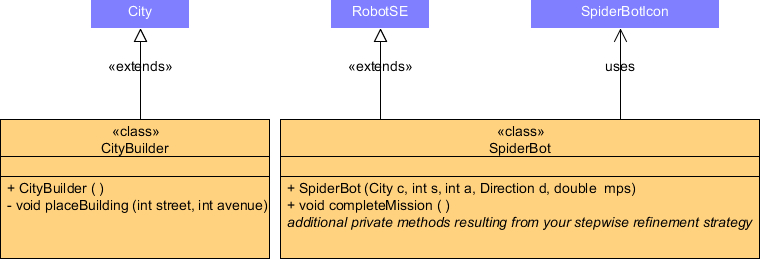
- Create a project called SuperHeroes and drop the driver file SuperHeroes.java. into the src folder.
- Add the class file SpiderBotIcon.java to the src folder of the project.
- Add the graphic file SpiderBot.gif to the root folder of the project.
- You are not to modify the three previous files in any way.
- Examination of the driver class reveals the need for CityBuilder and SpiderBot classes. Their UML diagrams appear below. Note. The fifth parameter of the SpiderBot constructor is to be interpreted as the default speed (movesPerSecond) of the object.
- Due to gravity, the speed of the SpiderBot's descent of a building is twice the normal speed of the object. One intersection prior to landing the descent, the speed of the SpiderBot is restored to its normal speed before continuing (this ensures a soft landing)
- The project finishes with the SpiderBot object at intersection (5,6).
- Download SuperHeroes.jar and SpiderBot.gif to your Desktop and run the application to see what's expected.
Attach fully javadoced CityBuilder and SpiderBot source (.java) files (only!) to an email to handin with the Subject Line SuperHeroes by the deadline.
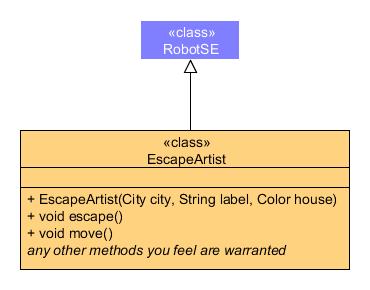
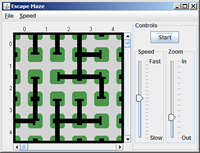
![]() EscapeMaze. Each of
you has a unique 5×5 maze you are to navigate your way out of. The exit
of the maze is located at the east wall of intersection (4,4) (see below left).
EscapeMaze. Each of
you has a unique 5×5 maze you are to navigate your way out of. The exit
of the maze is located at the east wall of intersection (4,4) (see below left).
Task.
- Create a project called EscapeMaze and add a driver class by the same name.
- Construct a City object from the file below that bears your name. Enable your City to display the numbers of Thing objects at all intersections.
- Model yourself as an object of the EscapeArtist class defined by the UML diagram to the right. Add statements to your EscapeArtist constructor that guarantees your initial location is at (0,0), facing west, and you have exactly 25 Things in your backpack. Set your label and house colour as defined by the constructors parameters.
- Using various implemented and inherited methods, navigate yourself as efficiently as possible to the exit, dropping a Thing object on every intersection you traverse. Finish facing east and drop all remaining Things in your backpack.
- Format and fully document your EscapeMaze and EscapeArtist source files.
- Attach only your EscapeMaze and EscapeArtist source files (not your text file) to an email to handin with the Subject Line: EscapeMaze by the deadline.
![]() Take Your Seat. Robots need to be programmed to find their seat in Room 210.
Take Your Seat. Robots need to be programmed to find their seat in Room 210.
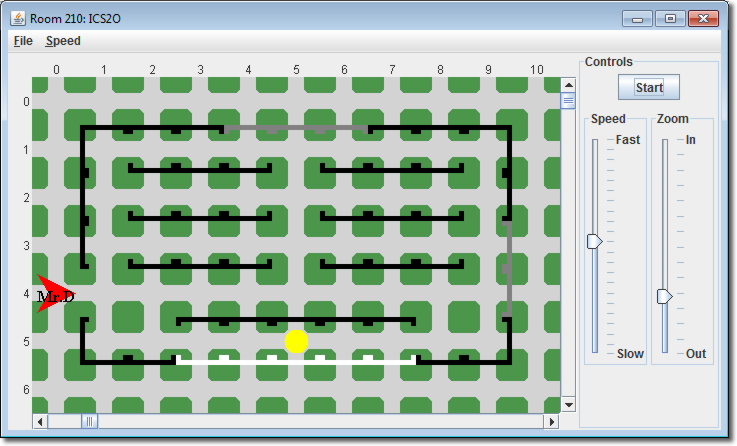
Task.
- Run this executable jar file to see Mr. D takes his seat: TakeYourSeat.jar
- Create a new Project entitled TakeYourSeat.
- Develop documented statements designed to set up Room 210 (the City object) as depicted in the applet above. Be sure to place a Thing object at your seat.
- Place a Robot object, labelled wth your name, at the door, ready to enter the room.
- Add documented statements that will result in you taking your seat, facing the front of the room, and finally picking the Thing up to let me know you're prepared for the class to begin.
Submitted your fully documented TakeYourSeat.java source file to handin by the deadline, under the Subject Line: Take Your Seat.
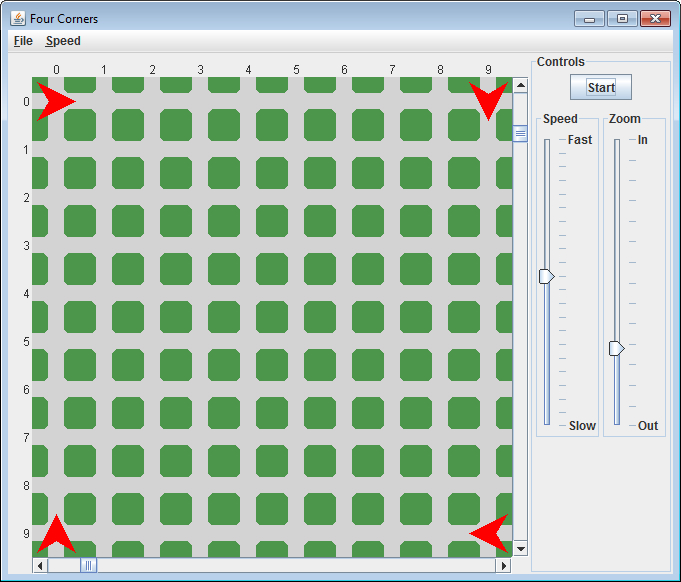
![]() Four Corners. For your first formal submission, you are asked to duplicate the Robots configuration so it appears exactly as depicted in the screen capture to the right at the moment of launch. You can click on the image for a larger view. Here are a couple of points to remember for those hoping to earn the highest possible credit,
Four Corners. For your first formal submission, you are asked to duplicate the Robots configuration so it appears exactly as depicted in the screen capture to the right at the moment of launch. You can click on the image for a larger view. Here are a couple of points to remember for those hoping to earn the highest possible credit,
- All source code submitted is to be fully documented. I'll introduce you to these strategies in class on Monday February 4.
- Since the work in this course is demanding, you are going to have many questions. The ICS2OForum is the PROPER channel for you to post your concerns where your peers and I will respond with suggestions for you to consider. You are NOT to post code or be too specific about how to accomplish a task. Questions and answers are to be general. The WRONG way to have your questions answered is to look at the screens of your peers, or have them email you their work. Please remember the risk to your reputation is far costlier than the zero you'll receive.